- Login to the Wavlink router login interface on your computer.
- Go into the Settings and open the Wireless Settings.
- Select SSID and enter the new WiFi password.
- SAVE settings and then you can use this new password to connect to the Wavlink network.
Wavlink Wizard for Wavlink Router Setup
Learn how to do Wavlink WiFi router setup effortlessly in just minutes by following the precise instructions of the Wavlink Wizard. Additionally, find valuable troubleshooting tips for common Wavlink router setup and login challenges. Your new Wavlink router can be setup easily. Wavlink Wizard help you set up Wi-Fi, extend WiFi network, or get online. Explore answers for how to connect your Wavlink router, view its setup page, and get your devices online quickly. Start now to install Wavlink Router & maximize its potential.
Wavlink Router Setup
Before you setup Wavlink WiFi Router, make sure to keep in mind the following important points.
- Default IP address: 192.168.10.1
- Login URL: wavlogin.link or wifi.wavlink.com
- SSID: Wavlink_XXXX
- Admin password: admin (lowercase)
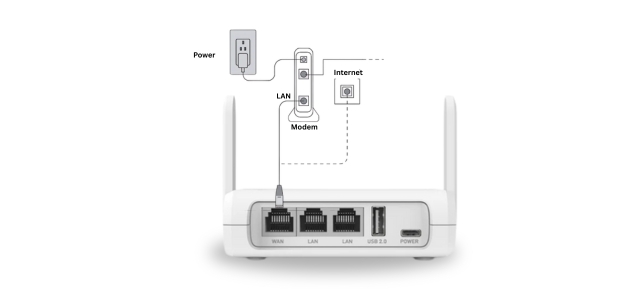
How to Cable Your Wavlink Router with Modem?
To connect your Wavlink router to your home modem, put the router in close proximity to the modem and follow these steps:
- Disconnect home modem from power socket.
- Use the Ethernet cable to connect router to modem.
- Plug the cable’s end to WAN port of the router.
- Connect the other end of the cable to modem‘s LAN port.
- Now, turn the router and modem on and access Wavlink router login interface for configuration.

How to Reach Wavlink WiFi Router Setup Login Interface?
-
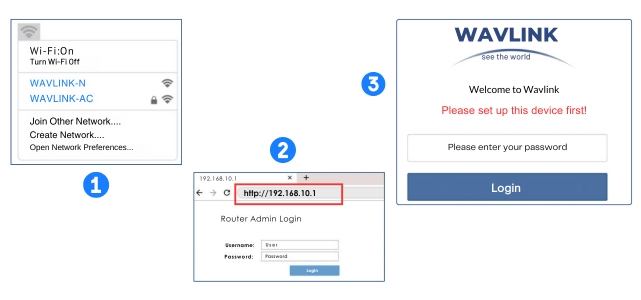
Connect PC with Wavlink SSID:
To connect a PC with the Wavlink router network, you have to activate the PC’s Wi-Fi and select the Wavlink_xxxx named network. It will be an open network.
-
Open Browser and Reach Login Page:
After the connection, open the updated browser and search the login URL wavlogin.link or wifi.wavlink.com. You can also use the default IP address 192.168.10.1 to reach the interface login page.
-
Access Wavlink Router Login Interface:
Entering the URL or IP address will load Login page, wherein you have to enter the default admin login password. The admin password is: admin (in lowercase). Enter the login password and click LOGIN NOW button to access the interface.

How to Configure Wavlink WiFi Router?
- Choose a WAN type of the router: DHCP, PPPoE, and Static IP. Have a look at the definition of each so that you can choose one easily.
PPPoE: If you are using the DSL line and have an account name and a password from your ISP, then choose PPPoE.
DHCP (Dynamic): If you are using other internet type, choose DHCP type.
Static IP: If you have an IP address from ISP, choose Static IP type.
- Now, select country and time zone and click SAVE & NEXT.
- Enter the new Wavlink router SSID details like Wi-Fi name and password.
- Click SAVE & NEXT.
Now, wait until the Process completes to 100%, here after you must click Refresh. The device reboots and then you can connect to the newly created network.

Common Wavlink Router Setup Issues
- Wavlink router showing Red light
- Router can’t connect with modem
- Wavlink WiFi router not working
Troubleshooting Wavlink Router Setup Errors
Wavlink Router Showing Red Light
- Red light on the Wavlink router means the router is connected to the modem but having no internet signals. To solve it, check modem to router link. Make sure the Ethernet cable is connected correctly and not damaged.
- Reboot WiFi router by simply disconnecting it from power socket and connecting it to power again. If the red light is still showing up on the device, power cycle the router as well as the modem. To do it, plug out all cables from the devices and then after a few minutes reconnect them.
Router Can’t Connect to Modem
If router is not able to establish connection with the modem, use another pair of Ethernet cable for the connection replacing the current one.
Wavlink WiFi Router not Working
Reset your router if it is not working. To reset press and hold its RESET pinhole button with the help of a pointed pen or paper pin. Hold it for 10 seconds and release; it will start the reset process.
Common Wavlink WiFi Router Login Errors
- Cannot reach Wavlink Wireless Router Setup Interface Login Page
- Cannot Login to Wavlink Wireless Router Setup interface
- Cannot Connect to Wavlink SSID network after setup
Troubleshooting Wavlink WiFi Router Login Errors
Cannot Reach Wavlink Wireless Router Setup Interface Login Page
- Check the login URL that you have entered on the web browser is correct or not. The right URL address for the Wavlink router is wavlogin.link or wifi.wavlink.com.
- If the URL is not working, use the default IP address to reach the Wavlink WiFi router setup login page which is 192.168.10.1.
Cannot Login to the Wavlink Wireless Router Setup Interface
Check if the admin default password is correct. The default login password is given on the back label of the router or it is “admin” in lowercase letters.
Cannot Connect to Wavlink SSID Network After Setup
- Make sure you have SAVED settings in the interface and rebooted the device. If not go back to the interface and click Refresh button to apply the settings.
- After reboot, if you are seeing the same old SSID username on the Wi-Fi list of your device, then reset the router by pressing and holding the router’s RESET button.
FAQs
How to Change Wavlink WiFi Password?
How to Change Wavlink Admin Password?
- Access Wavlink router setup/login interface using the IP address 192.168.10.1.
- Go into the settings and select the admin profile.
- Enter the new password for the admin window and click SAVE.
- Now, whenever you login to the interface use this new password.
How to Update Wavlink WiFi Router Firmware?
- At first download the latest firmware file from the official website of Wavlink.
- Extract the file and login to the router interface on your connected computer.
- Open “More” option and select Settings.
- Click System and choose the Firmware update option.
- Here browse the file and paste it.
- Click Apply and wait until firmware update process completes.
How to Connect Extender with Wavlink Router?
There is a WPS button on the router. When you press the extender’s WPS button, press the router’s as well and wait for the auto connection between the two. Now you can plug the extender anywhere within the reach of the router and enjoy the extended network.
Why Wavlink WiFi Router Isn’t Working?
There could be many reasons why your router is not working. Refer below list of root causes, have a quick look:
- Modem not connected to the router
- Router not having any power
- Router firmware has been corrupted
- Router facing a lot of issues and want a reset.

