Long press the small reset button on the extender for around 10 seconds. Once you see the LED light begins to flash, release the button. The flashing LED indicates, the extender is resetting itself.
If you want to stream video from an outdoor camera, use the internet in the backyard, or just boost the signal across a big property, you can do all this through Wavlink Outdoor Extender Setup. Wavlink Wizard will take you through the complete step by step procedure on: how to install Wavlink Outdoor Extender physically, how to set it up the right way, what the lights on it mean, and which mode to pick depending on your usage. We’ll also help you troubleshoot if something goes wrong later.
There are various models of Wavlink WiFi extender for outdoor use. The models are: the Aerial HD4, AX1800, and AC600. These devices are designed to withstand extreme outdoor conditions and provide extended WiFi coverage. They can also be used as repeaters, access point routers, etc. but it depends on what your network setup is like.
When you open the box, here’s what you will find:
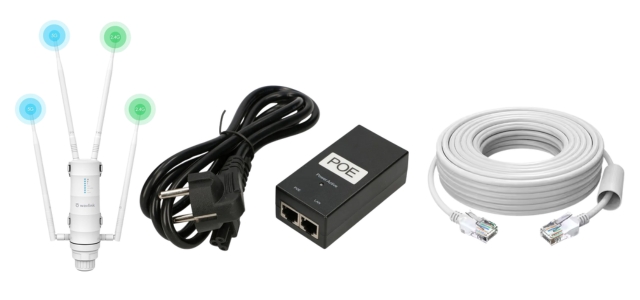
Screw the antennas firmly on the extender’s antenna ports.
Using the mounting hardware, attach the extender to a wall or pole. Choose an open space with halfway between your router and the area where extended internet coverage is required.
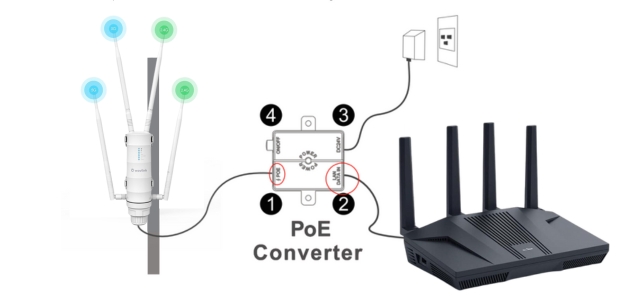
Plug one end of the provided ethernet cable into the LAN port of the extender and the other end into the “PoE” port of the injector. Connect the injector’s “LAN” port to your router using another ethernet cable.
Now, plug the power adapter into the PoE injector and connect it to power outlet. The extender will power on, and LED indicators will light up.
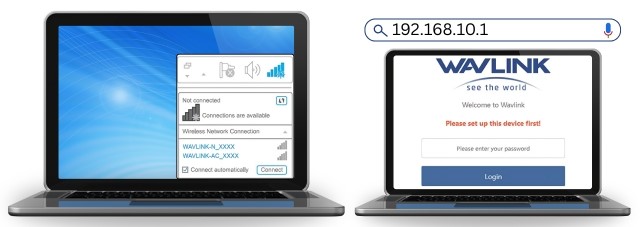
On your laptop or mobile, search for a network named something like WAVLINK-XXXX. This is the extender’s default SSID.
Type IP address: “192.168.10.1” or URL: “wifi.wavlink.com” in your browser’s address bar.
Use the default login credentials that are “admin” for both. (Username and password).
You’ll now access the web configuration panel to adjust settings as per your requirements.
Wavlink outdoor extender setup can be done through various methods. Choose the one based on your needs:
Let’s configure Wavlink Outdoor WiFi range extender in repeater method:
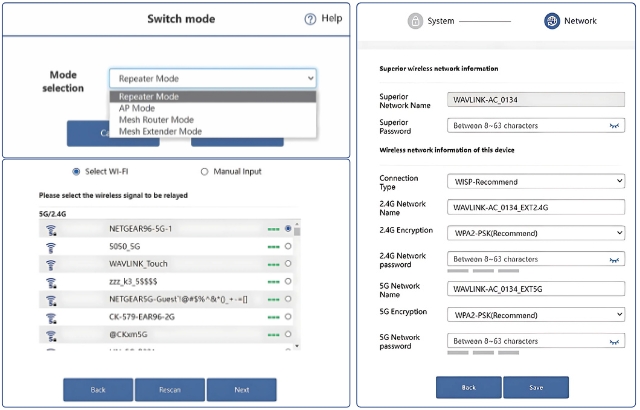
Use this method for creating a new wireless network using a wired connection.
Use this if you’re connecting the extender directly to the modem.
Used to connect to a public hotspot and broadcast a private network.
Wavlink outdoor extenders come with LED lights that indicate device status. Here’s what they typically mean:
Solid Green: Power is on and stable
Off: No power supply detected
Solid Green: Strong connection with the router
Orange/Yellow: Moderate signal
Red/Flashing: Weak signal or disconnected
Blinking: Active data transmission through LAN port
Solid: Connected, no data transfer
Off: No LAN connection
Flashing Blue: Booting or configuring
Solid Blue: Device is functioning properly
Red Flash: System error or failed setup
Try using another browser or clearing your cache from the existing browser. Make sure your device is connected to the extender’s network.
Reposition the extender closer to the main router or reduce nearby interferences.
The device may be trying to connect or might be experiencing a loop. Try resetting and reconfiguring.
Reset the extender and try setting it up again from scratch.
Setting up a Wavlink Outdoor WiFi Extender the right way can completely eliminate weak signals in those frustrating dead zones.
These devices are made to perform outdoors, with solid hardware, smart modes, and rough outdoor weather conditions. Wavlink Wizard provided you the right steps to install the device; just place it well, and it’ll keep your connection going strong no matter where you are.
Long press the small reset button on the extender for around 10 seconds. Once you see the LED light begins to flash, release the button. The flashing LED indicates, the extender is resetting itself.
No, having a Wavlink router is not compulsory. These extenders work with routers of all brands, such as TP-Link, Netgear, Linksys, or anything else. As long as your router is broadcasting a standard wireless signal, you’re good to go.
It depends on the model you’re using, but most of Wavlink’s outdoor units can push the signal as far as 500 meters in open air. That’s without walls or big obstacles in the way.
Most of the recent models do offer PoE, which means you can power them and run data through the same Ethernet cable—makes the setup Wavlink WiFi range extender, a lot clean and simplified. But it’s not present in every model by default. Therefore, it’s better to check the packaging or the configuration of the model on the official site before you buy or start installation.
It depends on your Wavlink outdoor extender setup. If you’re just looking to extend the WiFi from inside your house to an outdoor space—like a patio, garden, or side shed—Repeater Mode is your best bet. But if you’ve already run a network cable to the outside spot, then switch it to Access Point Mode. That provides you with stronger and more reliable speed, especially if you want to cover a larger area.
