Majorly it is “admin” for both that is username and password. For more accurate details, check the label of the device.
The simplicity of Wavlink WiFi Repeater Setup is its greatest asset. It doesn’t require any advanced networking knowledge, extra wiring, or additional routers. All it does is grab your existing WiFi signal and rebroadcast it, effectively stretching your coverage and eliminating those frustrating network dead zones.
Wavlink Wizard has crafted user manual guide to walk you through everything you need to know—from what Wavlink Repeater Mode actually is, to how to set it up, understand the LED indicators, and troubleshoot any issues that may pop up along the way.
Wifi drops are frustrating! Whether you are in the top floor bedroom, basement or in the last room in your hallway, we believe internet should be transmitted equally irrespective of the place. Wavlink Wizard promises to reach those dead network zones of your home through “Wavlink WiFi Repeater setup”.
Repeater Mode of a Wavlink Repeater is exactly what it sounds like. It takes the already existing WiFi signal coming from your main router and repeats it—sending it further into those weak-signal areas of your space.
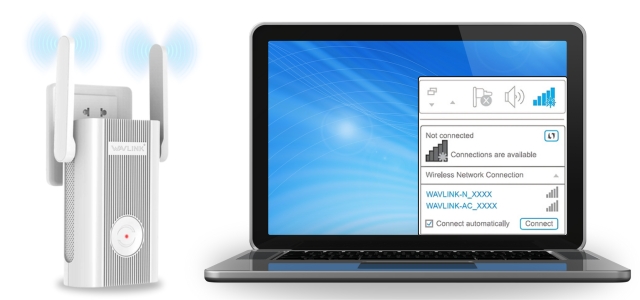
The key feature here is no ethernet cable is required. Unlike Access Point Mode, where you’d have to plug the repeater into your router using a physical cable; Repeater Mode works completely wirelessly. That means you can setup the Wavlink Repeater at any spot that already receives a decent signal from your main router—no drilling, no wires to be laid, just plug it in and enjoy your extended network.
To setup WiFi repeater, ensure you’ve all these components in place:
There are two ways to configure the Wavlink repeater:
Let’s go through both the methods step-by-step.
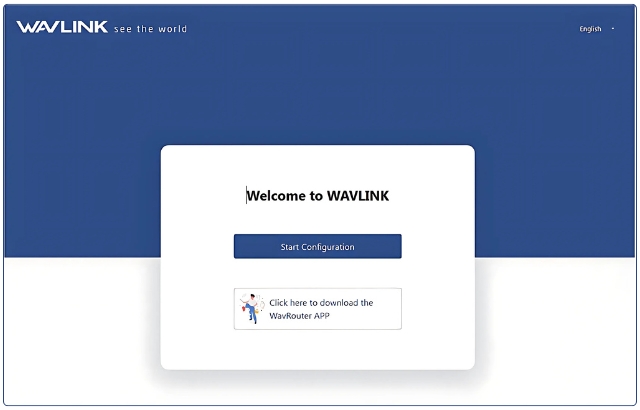
This is most commonly used method for Wavlink repeater configuration and is supported by all Wavlink models.

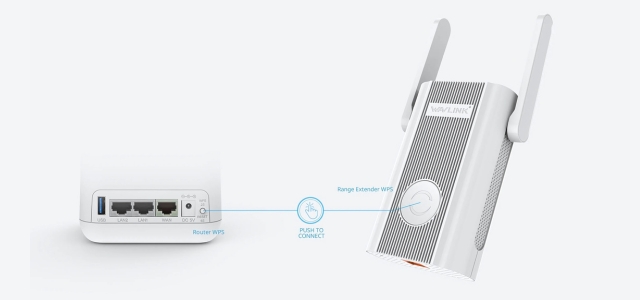
If your router supports WPS, this method takes less than 2 minutes.
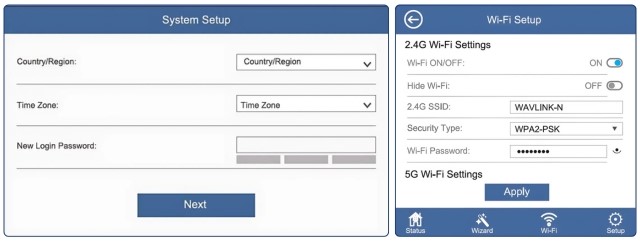
Once Wavlink WiFi Repeater setup is complete, you can log back into the repeater at 192.168.10.1 to:
As we’ve successfully installed Wavlink WiFi Repeater in repeater mode, you can now enjoy a noticeable boost in connectivity where it used to be weak or nonexistent. You’ve to just follow the above given step by step procedure, check the LED status, and fine-tune the placement for the best results.
Setup your Wavlink WiFi repeater today and say goodbye to buffering, dropouts, and dead zones.
Facing more issues and require Wavlink repeater setup support? Save this Wavlink Wizard guide, share it with others, and revisit anytime you need help managing your wireless network. Else you can also reach out to us through call, mail or live chat.
Majorly it is “admin” for both that is username and password. For more accurate details, check the label of the device.
Depending on your environment and model, it can extend coverage up to 300–500 feet.
Yes, using the same SSID allows devices to switch seamlessly between router and repeater.
In Repeater Mode, the device connects wirelessly. But if you want to use ethernet cable, switch to Access Point mode.
Make sure you’re connected to the Wavlink network properly. Try typing “192.168.10.1” directly into the address bar.
Yes, you can reset the device by pressing the reset button for about 10 seconds. The device will return to factory defaults.
